
At The Art and Design Factory, we understand that the cost of living has risen substantially, and we want to work with you to ensure that you can continue having fun with your children over the school summer holidays.
Today, I am going to provide you with step-by-step instructions on how you can paint a flower with your children for as little as £3. A lot of the items you may already have in your own home.
Floral pattern design materials required:
- A4 Paper
- Watercolour paint – £3 per palette and can be bought from an art shop or online
- Cotton buds
- Coloured markers
- Water jar
- Paintbrush
- Pencil
- Rubber.
Please share your children’s artwork creations on my social channels:
- Facebook – https://www.facebook.com/TheArtandDesignFactory
- Instagram – https://www.instagram.com/the_art_and_design_factory/
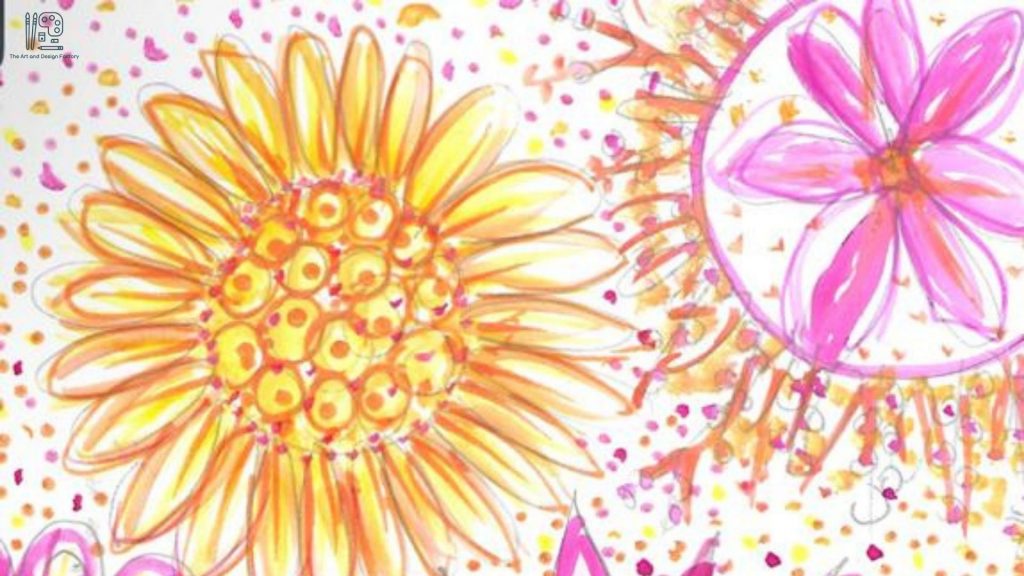
- Take a beaker, egg cup, roll of sellotape or a cup, place it in the centre of the page, and help your child draw around it in pencil. You can pair, share, and take turns drawing around the circular shapes. During this time, get them to draw some full circles on the page and half-circles at the side of the page. When drawing the various circles, ask your child what is the smallest, largest, etc., depending on their age. Chat to them about the shape and ask where else they can see similar shapes in the room or the surrounding landscape?
- Show your child how to draw the flower’s petals by using the letter ‘v” at the top and bottom of the petal and then join the lines in between. Please encourage your child to draw various shapes for each flower’s petals, making each of them different and unique. Share how they can create their flowers by drawing different patterns inside the flower’s centre and draw shapes such as hearts, smaller circles, triangles or whatever shapes they like.
- Continue drawing the petals around outside for each flower.
- Once they draw all the petals, they can start to add colour.
- Explain to your child to select warm colours consisting of warm yellows, oranges or reds or use cool colours of blue, purple and green. If they are painting their entire flower, share how sometimes, when warm and cool colours are mixed, they can create earthy browns, so best use warm or cool colours.
- Please encourage your child to use their cotton bud in their water jar and then gather some paint. This can be used to apply colour to the inside of their flower and create a pattern. Demonstrate to them how to use a dabbing technique and encourage them to fill the centre of the flower with different tints and tones mixed together. When this area is dry, they can go around areas with pen markers to make it stand out.
- They then can add various colours to the petals but instead of dabbing on, sweep the paint over the surface area of the petals and then add more details when dry.
- The background can be painted using cotton buds and dots created by a marker or the back of a paintbrush. Let your child have fun by using their imagination and creativity.
- Their design could be made Into a card and sent to a loved one in the post or framed and displayed within your home to boost their confidence and remind them of their talent.